|
Software has been written to implement the ideas behind the proposed
heuristic. The process is slow, but my goals are as follows:
1. Construct prototype evaluation function in C++ programming language.
2. Transplant evaluation function into micro-max (freely available,
minimalist chess program).
3. Refine evaluation function.
4. Add more features to micro-max.
There were some surprises when writing the code:
1. There were a lot of redundant entries in the mobility tables.
2. There is a lot of data.
3. Keeping track of everything is difficult.
4. There are many opportunities for optimizing, but that will be done later.
5. The choice of a data structure is turning out to be critical.
- 1713 source lines of code (sloc) so far (method: counting semi-colons)
- C++ programming language
- minGW compiler (minimalist GNU for Windows)
Here is some of the output generated by the source code,
as of January 5, 2008:
| Test Position 1 |
|
| Black to move after 13.Qf2 |
1st, 2nd & 3rd order mobility/ influence tables, automatically
generated for Bishop on c1:
5: root c1 w bishop UpperLeft (c1-b2: w pawn) move[b2-b3 0-0] BLOCKED-F-MOVEABLE-DIRECTIONAL_ISSUE
6:
root c1 w bishop UpperRight (c1-d2: w pawn) move[d2-d3 0-0] BLOCKED-F-MOVEABLE-DIRECTIONAL_ISSUE
18: root c1 w bishop UpperLeft (c1-b2: w pawn) move[b2-b3 0-0] EMPTYFORMOBILITY
19: root c1 w bishop UpperLeft
(c1-a3: empty) move[b2-b3 0-0] EMPTYFORMOBILITY
20: root c1 w bishop UpperRight (c1-d2: w pawn) move[d2-d3 0-0] EMPTYFORMOBILITY
21:
root c1 w bishop UpperRight (c1-e3: empty) move[d2-d3 0-0] EMPTYFORMOBILITY
22: root c1 w bishop UpperRight (c1-f4:
empty) move[d2-d3 0-0] EMPTYFORMOBILITY
23: root c1 w bishop UpperRight (c1-g5: empty) move[d2-d3 0-0] EMPTYFORMOBILITY
24:
root c1 w bishop UpperRight (c1-h6: empty) move[d2-d3 0-0] EMPTYFORMOBILITY
61: root c1 w bishop UpperRight (b2-c3: empty) move[b2-b3 0-0] EMPTYFORMOBILITY
62: root c1 w bishop UpperRight
(b2-d4: w pawn) move[b2-b3 0-0] BLOCKED-F-NOTMOVEABLE
63: root c1 w bishop LowerRight (b2-c1: empty) move[b2-b3 0-0]
EMPTYFORMOBILITY
64: root c1 w bishop LowerLeft (b2-a1: w rook) move[b2-b3 0-0] BLOCKED-F-NOTMOVEABLE
65:
root c1 w bishop UpperRight (a3-b4: empty) move[b2-b3 0-0] EMPTYFORMOBILITY
66: root c1 w bishop UpperRight (a3-c5:
empty) move[b2-b3 0-0] EMPTYFORMOBILITY
67: root c1 w bishop UpperRight (a3-d6: b bishop) move[b2-b3 0-0] BLOCKED-E-CAPTURABLE
68:
root c1 w bishop LowerRight (a3-c1: empty) move[b2-b3 0-0] EMPTYFORMOBILITY
69: root c1 w bishop UpperLeft (d2-c3:
empty) move[d2-d3 0-0] EMPTYFORMOBILITY
70: root c1 w bishop UpperLeft (d2-b4: empty) move[d2-d3 0-0] EMPTYFORMOBILITY
71:
root c1 w bishop UpperLeft (d2-a5: empty) move[d2-d3 0-0] EMPTYFORMOBILITY
72: root c1 w bishop LowerRight (d2-e1:
w king) move[d2-d3 0-0] BLOCKED-F-MOVEABLE
73: root c1 w bishop LowerLeft (d2-c1: empty) move[d2-d3 0-0] EMPTYFORMOBILITY
74:
root c1 w bishop UpperLeft (e3-d4: w pawn) move[d2-d3 0-0] BLOCKED-F-NOTMOVEABLE
75: root c1 w bishop LowerRight
(e3-f2: w queen) move[d2-d3 0-0] BLOCKED-F-MOVEABLE
76: root c1 w bishop LowerLeft (e3-c1: empty) move[d2-d3 0-0]
EMPTYFORMOBILITY
77: root c1 w bishop UpperLeft (f4-e5: empty) move[d2-d3 0-0] EMPTYFORMOBILITY
78: root
c1 w bishop UpperLeft (f4-d6: b bishop) move[d2-d3 0-0] BLOCKED-E-CAPTURABLE
79: root c1 w bishop LowerRight (f4-g3:
w knight) move[d2-d3 0-0] BLOCKED-F-MOVEABLE
80: root c1 w bishop LowerLeft (f4-c1: empty) move[d2-d3 0-0] EMPTYFORMOBILITY
81:
root c1 w bishop UpperLeft (g5-f6: empty) move[d2-d3 0-0] EMPTYFORMOBILITY
82: root c1 w bishop UpperLeft (g5-e7:
empty) move[d2-d3 0-0] EMPTYFORMOBILITY
83: root c1 w bishop UpperLeft (g5-d8: empty) move[d2-d3 0-0] EMPTYFORMOBILITY
84:
root c1 w bishop LowerRight (g5-h4: b queen) move[d2-d3 0-0] BLOCKED-E-CAPTURABLE
85: root c1 w bishop LowerLeft
(g5-c1: empty) move[d2-d3 0-0] EMPTYFORMOBILITY
86: root c1 w bishop UpperLeft (h6-g7: b pawn) move[d2-d3 0-0] BLOCKED-E-CAPTURABLE
87:
root c1 w bishop LowerLeft (h6-c1: empty) move[d2-d3 0-0] EMPTYFORMOBILITY
LEGEND:
▒ 1 move influence
o 2 move influence
. 3 move influence
X piece is constrained from this square
┌───┬───┬───┬───┬───┬───┬───┬───┐
┌───┬───┬───┬───┬───┬───┬───┬───┐
│
│ . │ │ . │ . │ . │ . │ │
│ │ X │ │ X │ X │ X │ X │ │
├───┼───┼───┼───┼───┼───┼───┼───┤
├───┼───┼───┼───┼───┼───┼───┼───┤
│
. │ . │ . │ . │ . │ o │ . │ . │ │ X │
. │ X │ X │ X │ X │ X │ X │
├───┼───┼───┼───┼───┼───┼───┼───┤
├───┼───┼───┼───┼───┼───┼───┼───┤
│
. │ . │ . │ . │ . │ o │ . │ o │ │ . │
X │ . │ X │ X │ X │ X │ X │
├───┼───┼───┼───┼───┼───┼───┼───┤
├───┼───┼───┼───┼───┼───┼───┼───┤
│
. │ o │ . │ . │ . │ o │ o │ . │ │ . │
o │ X │ X │ X │ X │ X │ X │
├───┼───┼───┼───┼───┼───┼───┼───┤
├───┼───┼───┼───┼───┼───┼───┼───┤
│
. │ . │ o │ ▒ │ o │ o │ . │ o │ │ X │
X │ X │ ▒ │ o │ X │ X │ X │
├───┼───┼───┼───┼───┼───┼───┼───┤
├───┼───┼───┼───┼───┼───┼───┼───┤
│
o │ o │ o │ o │ ▒ │ ▒ │ ▒ │ . │
│ X │ X │ X │ X │ X │ X │ X │ X │
├───┼───┼───┼───┼───┼───┼───┼───┤
├───┼───┼───┼───┼───┼───┼───┼───┤
│
. │ o │ o │ ▒ │ ▒ │ Q │ ▒ │ o │
│ . │ o │ o │ ▒ │ ▒ │ Q │ ▒ │ o │
├───┼───┼───┼───┼───┼───┼───┼───┤
├───┼───┼───┼───┼───┼───┼───┼───┤
│
│ . │ . │ o │ ▒ │ ▒ │ ▒ │ o │ │
│ . │ . │ o │ ▒ │ ▒ │ ▒ │ o │
└───┴───┴───┴───┴───┴───┴───┴───┘
└───┴───┴───┴───┴───┴───┴───┴───┘
Influence
Diagram, w queen on f2 and corresponding Engagement Diagram.
┌───┬───┬───┬───┬───┬───┬───┬───┐
┌───┬───┬───┬───┬───┬───┬───┬───┐
│
│ │ . │ │ . │ │ . │ │
│ │ │ X │ │ X │ │ X │
│
├───┼───┼───┼───┼───┼───┼───┼───┤
├───┼───┼───┼───┼───┼───┼───┼───┤
│
│ . │ │ . │ o │ . │ o │ . │ │
│ X │ │ X │ X │ X │ X │ X │
├───┼───┼───┼───┼───┼───┼───┼───┤
├───┼───┼───┼───┼───┼───┼───┼───┤
│
. │ │ . │ o │ . │ o │ . │ o │ │
. │ │ X │ X │ X │ X │ X │ X │
├───┼───┼───┼───┼───┼───┼───┼───┤
├───┼───┼───┼───┼───┼───┼───┼───┤
│
│ . │ o │ . │ │ ▒ │ o │ ▒ │
│ │ X │ o │ X │ │ X │ X │ X │
├───┼───┼───┼───┼───┼───┼───┼───┤
├───┼───┼───┼───┼───┼───┼───┼───┤
│
. │ │ . │ o │ ▒ │ o │ . │ o │ │
X │ │ X │ X │ ▒ │ X │ X │ X │
├───┼───┼───┼───┼───┼───┼───┼───┤
├───┼───┼───┼───┼───┼───┼───┼───┤
│
│ . │ o │ . │ o │ . │ N │ . │ │
│ . │ o │ X │ X │ X │ N │ X │
├───┼───┼───┼───┼───┼───┼───┼───┤
├───┼───┼───┼───┼───┼───┼───┼───┤
│
. │ │ . │ o │ ▒ │ o │ . │ . │ │
. │ │ X │ o │ ▒ │ o │ X │ . │
├───┼───┼───┼───┼───┼───┼───┼───┤
├───┼───┼───┼───┼───┼───┼───┼───┤
│
│ . │ o │ . │ │ ▒ │ o │ ▒ │
│ │ . │ o │ X │ │ ▒ │ o │ ▒ │
└───┴───┴───┴───┴───┴───┴───┴───┘
└───┴───┴───┴───┴───┴───┴───┴───┘
Influence
Diagram, w knight on g3 and corresponding Engagement Diagram.
Note that the Queen
mobility to squares f5, f6 and f7 can be accomplished in 2 moves if we play the capture move f3xe4 on move 1.
┌───┬───┬───┬───┬───┬───┬───┬───┐
┌───┬───┬───┬───┬───┬───┬───┬───┐
│
│ │ │ │ │ │ │
│ │ │ │ │ │
│ │ │ │
├───┼───┼───┼───┼───┼───┼───┼───┤
├───┼───┼───┼───┼───┼───┼───┼───┤
│
. │ │ │ │ │ │
│ │ │ X │ │ │
│ │ │ │ │
├───┼───┼───┼───┼───┼───┼───┼───┤
├───┼───┼───┼───┼───┼───┼───┼───┤
│
. │ │ │ │ │ │
│ │ │ . │ │ │
│ │ │ │ │
├───┼───┼───┼───┼───┼───┼───┼───┤
├───┼───┼───┼───┼───┼───┼───┼───┤
│
. │ │ │ │ │ │
│ │ │ . │ │ │
│ │ │ │ │
├───┼───┼───┼───┼───┼───┼───┼───┤
├───┼───┼───┼───┼───┼───┼───┼───┤
│
o │ │ │ │ │ │
│ │ │ o │ │ │
│ │ │ │ │
├───┼───┼───┼───┼───┼───┼───┼───┤
├───┼───┼───┼───┼───┼───┼───┼───┤
│
o │ . │ . │ . │ . │ . │ │ │
│ X │ X │ X │ X │ X │ X │ │ │
├───┼───┼───┼───┼───┼───┼───┼───┤
├───┼───┼───┼───┼───┼───┼───┼───┤
│
▒ │ . │ │ │ │ │ │
│ │ ▒ │ . │ │ │ │
│ │ │
├───┼───┼───┼───┼───┼───┼───┼───┤
├───┼───┼───┼───┼───┼───┼───┼───┤
│
R │ ▒ │ o │ │ │ │ │
│ │ R │ ▒ │ o │ │ │
│ │ │
└───┴───┴───┴───┴───┴───┴───┴───┘
└───┴───┴───┴───┴───┴───┴───┴───┘
Influence
Diagram, w rook on a1 and corresponding Engagement Diagram.
Note that the pawn on a2 can advance to a4 then capture the pawn
on b5, opening the way for the rook to move to a6 and a7.
Look at all this useful information we can extract from the position
of the pieces on the board!
The machine can use these influence maps as "probes" to determine
how fully engaged each piece is in the game. Of course, there are other calculations we can do to gain insight into
how well each piece is positioned, but there would have to be a corresponding performance increase in spending the time to
make the additional calculation. The proposed heuristic has "bang for the buck" in terms of insight versus speed of calculation.
Once all the influence maps are generated for each piece, we
can determine the limiting factors that are likely to restrict the movement of each piece.
We need to decide on a rule, and the simplest one is this: make a map of the lowest value piece
(consider Bishops and Knights to be equivalent for now) that can attack each square, for each side. The idea here is that
each lower value piece constrains the movement of the opponent's higher value pieces because it can threaten to capture
it. For example, a white pawn that attacks a certain square will most likely prevent the opponent's pieces (bishops, knights,
rooks, queens and the king) from moving there, but this is not so true for the opponent's pawns.
The other condition it makes sense to include in our constraint maps is a simple test for a "hung"
piece (a piece moves to a square attacked by an enemy piece and is unsupported by a friendly piece).
Black constraint map
┌───┬───┬───┬───┬───┬───┬───┬───┐
│
│ r │ n │ r │ r │ n │ r │ │
├───┼───┼───┼───┼───┼───┼───┼───┤
│
r │ │ n │ n │ n │ n │ │ r │
├───┼───┼───┼───┼───┼───┼───┼───┤
│
│ p │ │ p │ p │ p │ p │ p │
├───┼───┼───┼───┼───┼───┼───┼───┤
│
│ │ n │ n │ n │ n │ q │ q │
├───┼───┼───┼───┼───┼───┼───┼───┤
│
p │ n │ p │ │ q │ n │ n │ │
├───┼───┼───┼───┼───┼───┼───┼───┤
│
n │ │ n │ p │ n │ p │ n │ n │
├───┼───┼───┼───┼───┼───┼───┼───┤
│
│ │ │ │ │ │ │
q │
├───┼───┼───┼───┼───┼───┼───┼───┤
│
│ │ │ │ │ │ │
│
└───┴───┴───┴───┴───┴───┴───┴───┘
White constraint map
┌───┬───┬───┬───┬───┬───┬───┬───┐
│
│ │ │ │ │ │ │
│
├───┼───┼───┼───┼───┼───┼───┼───┤
│
│ │ │ │ │ │ │
│
├───┼───┼───┼───┼───┼───┼───┼───┤
│
│ │ │ │ │ │ │
│
├───┼───┼───┼───┼───┼───┼───┼───┤
│
│ N │ P │ │ P │ N │ │ N │
├───┼───┼───┼───┼───┼───┼───┼───┤
│
│ │ N │ Q │ P │ │ P │ │
├───┼───┼───┼───┼───┼───┼───┼───┤
│
P │ P │ P │ N │ P │ P │ P │ P │
├───┼───┼───┼───┼───┼───┼───┼───┤
│
R │ N │ │ N │ N │ K │ N │ R │
├───┼───┼───┼───┼───┼───┼───┼───┤
│
│ R │ │ K │ Q │ N │ R │ N │
└───┴───┴───┴───┴───┴───┴───┴───┘
Now if we take the black constraint map and apply
it to the White Bishop influence map (using the rules we mentioned above, including a simple test for a hung piece) we
get this engagement diagram:
┌───┬───┬───┬───┬───┬───┬───┬───┐
┌───┬───┬───┬───┬───┬───┬───┬───┐
│
│ │ │ . │ │ │ │
│ │ │ │ │ X │
│ │ │ │
├───┼───┼───┼───┼───┼───┼───┼───┤
├───┼───┼───┼───┼───┼───┼───┼───┤
│
│ │ │ │ . │ │ . │ │
│ │ │ │ │ X │ │ X │
│
├───┼───┼───┼───┼───┼───┼───┼───┤
├───┼───┼───┼───┼───┼───┼───┼───┤
│
│ │ │ . │ │ . │ │ o │
│ │ │ │ X │ │ X │ │
X │
├───┼───┼───┼───┼───┼───┼───┼───┤
├───┼───┼───┼───┼───┼───┼───┼───┤
│
. │ │ . │ │ . │ │ o │ │
│ . │ │ . │ │ X │ │ X │ │
├───┼───┼───┼───┼───┼───┼───┼───┤
├───┼───┼───┼───┼───┼───┼───┼───┤
│
│ . │ │ . │ │ o │ │ . │
│ │ X │ │ . │ │ X │ │ X │
├───┼───┼───┼───┼───┼───┼───┼───┤
├───┼───┼───┼───┼───┼───┼───┼───┤
│
o │ │ . │ │ o │ │ . │ │
│ o │ │ . │ │ o │ │ X │ │
├───┼───┼───┼───┼───┼───┼───┼───┤
├───┼───┼───┼───┼───┼───┼───┼───┤
│
│ ▒ │ │ ▒ │ │ . │ │
│ │ │ ▒ │ │ ▒ │
│ . │ │ │
├───┼───┼───┼───┼───┼───┼───┼───┤
├───┼───┼───┼───┼───┼───┼───┼───┤
│
. │ │ B │ │ . │ │ │
│ │ . │ │ B │ │ . │
│ │ │
└───┴───┴───┴───┴───┴───┴───┴───┘
└───┴───┴───┴───┴───┴───┴───┴───┘
Influence
Diagram, w bishop on c1 and corresponding Engagement Diagram.
There are other places where the Bishop is not safe,
but we decide to determine piece safety through search. The maps are useful in 1) steering our search efforts 2)
deciding which lines of analysis we are no longer interested in and 3) evaluating the usefulness of the positions at the end
points of our search tree
We can now use these maps to evaluate the level of engagement of this piece in
the game.
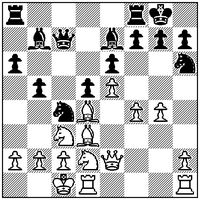
Example Number 2
| Hydra (computer) |
|
| Arno Nickel |
The above position was reached after 18.g4 was played in a 2004
correspondence game between correspondence GM Arno Nickel and the Hydra computer.
The black knight on h6 is trapped. Perhaps it is better just to
say that it has been constrained to stay on the edge of the board by the white pawns and the location of the other
pieces. The machine, calculating 200 million positions per second, probably doesn't even realize this. The influence
diagram and engagement diagram below strongly suggest that the black knight has problems with realistic
attempts to move on the board.
┌───┬───┬───┬───┬───┬───┬───┬───┐
┌───┬───┬───┬───┬───┬───┬───┬───┐
│
│ │ . │ . │ . │ │ ▒ │ . │
│ │ │ X │ . │ X │ │ ▒ │ . │
├───┼───┼───┼───┼───┼───┼───┼───┤
├───┼───┼───┼───┼───┼───┼───┼───┤
│
│ . │ │ . │ o │ ▒ │ o │ . │ │
│ X │ │ X │ X │ ▒ │ X │ X │
├───┼───┼───┼───┼───┼───┼───┼───┤
├───┼───┼───┼───┼───┼───┼───┼───┤
│
│ │ . │ o │ . │ o │ . │ n │ │
│ │ X │ X │ X │ X │ X │ n │
├───┼───┼───┼───┼───┼───┼───┼───┤
├───┼───┼───┼───┼───┼───┼───┼───┤
│
│ . │ │ . │ o │ ▒ │ . │ . │ │
│ X │ │ X │ X │ X │ X │ X │
├───┼───┼───┼───┼───┼───┼───┼───┤
├───┼───┼───┼───┼───┼───┼───┼───┤
│
│ │ . │ o │ . │ │ ▒ │ o │
│ │ │ X │ X │ X │ │ X │ X │
├───┼───┼───┼───┼───┼───┼───┼───┤
├───┼───┼───┼───┼───┼───┼───┼───┤
│
│ . │ │ . │ o │ . │ o │ . │ │
│ X │ │ X │ X │ X │ X │ X │
├───┼───┼───┼───┼───┼───┼───┼───┤
├───┼───┼───┼───┼───┼───┼───┼───┤
│
│ │ . │ │ . │ o │ . │ o │
│ │ │ X │ │ X │ X │ X │ X │
├───┼───┼───┼───┼───┼───┼───┼───┤
├───┼───┼───┼───┼───┼───┼───┼───┤
│
│ │ │ . │ │ . │ │ . │
│ │ │ │ X │ │ X │ │
X │
└───┴───┴───┴───┴───┴───┴───┴───┘
└───┴───┴───┴───┴───┴───┴───┴───┘
Influence
Diagram, b knight on h6 and corresponding Engagement Diagram.
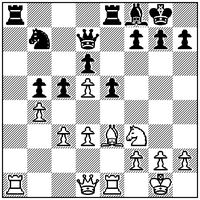
Example Number 3
| Miralles |
|
| Emms, black to move |
John Emms, in his book Simple Chess, reached the above position
as white with the idea of restricting the mobility of black's knight on b7. Exactly how bad is this piece? A traditional chess
program may never figure this out. Let's see what the influence diagram and engagement diagram from the
proposed heuristic shows us:
┌───┬───┬───┬───┬───┬───┬───┬───┐
┌───┬───┬───┬───┬───┬───┬───┬───┐
│
│ . │ │ ▒ │ │ . │ │ │
│ │ X │ │ ▒ │ │ X │ │
│
├───┼───┼───┼───┼───┼───┼───┼───┤
├───┼───┼───┼───┼───┼───┼───┼───┤
│
. │ n │ . │ . │ . │ o │ . │ │ │
X │ n │ X │ X │ X │ o │ X │ │
├───┼───┼───┼───┼───┼───┼───┼───┤
├───┼───┼───┼───┼───┼───┼───┼───┤
│
. │ . │ o │ ▒ │ o │ │ │ │
│ X │ X │ X │ ▒ │ X │ │ │ │
├───┼───┼───┼───┼───┼───┼───┼───┤
├───┼───┼───┼───┼───┼───┼───┼───┤
│
▒ │ │ ▒ │ │ . │ │ . │
│ │ X │ │ X │ │ X │
│ X │ │
├───┼───┼───┼───┼───┼───┼───┼───┤
├───┼───┼───┼───┼───┼───┼───┼───┤
│
. │ . │ o │ . │ . │ . │ │ │
│ X │ X │ X │ X │ X │ X │ │ │
├───┼───┼───┼───┼───┼───┼───┼───┤
├───┼───┼───┼───┼───┼───┼───┼───┤
│
. │ o │ │ . │ . │ │ │ │
│ X │ X │ │ X │ X │ │ │ │
├───┼───┼───┼───┼───┼───┼───┼───┤
├───┼───┼───┼───┼───┼───┼───┼───┤
│
│ . │ │ . │ │ │ │ │
│ │ X │ │ X │ │ │ │
│
├───┼───┼───┼───┼───┼───┼───┼───┤
├───┼───┼───┼───┼───┼───┼───┼───┤
│
. │ │ . │ │ │ │ │
│ │ X │ │ X │ │ │
│ │ │
└───┴───┴───┴───┴───┴───┴───┴───┘
└───┴───┴───┴───┴───┴───┴───┴───┘
Influence
Diagram, b knight on b7 and corresponding Engagement Diagram.
We can "see" that the movement of the piece has been constrained.
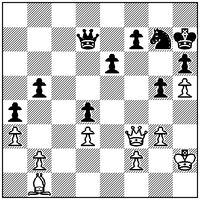
Example 4
| Emms |
|
| Baker, black to move |
In this position the black pawns are doing a great job restricting
the mobility of the white Bishop, which is not fully engaged in the game. Just how bad is this piece?
┌───┬───┬───┬───┬───┬───┬───┬───┐
┌───┬───┬───┬───┬───┬───┬───┬───┐
│
. │ │ │ │ │ │
│ │ │ X │ │ │
│ │ │ │ │
├───┼───┼───┼───┼───┼───┼───┼───┤
├───┼───┼───┼───┼───┼───┼───┼───┤
│
│ . │ │ . │ │ . │ │ │
│ │ X │ │ X │ │ X │ │
│
├───┼───┼───┼───┼───┼───┼───┼───┤
├───┼───┼───┼───┼───┼───┼───┼───┤
│
│ │ . │ │ o │ │ │ │
│ │ │ X │ │ X │ │ │
│
├───┼───┼───┼───┼───┼───┼───┼───┤
├───┼───┼───┼───┼───┼───┼───┼───┤
│
│ . │ │ o │ │ . │ │ │
│ │ X │ │ X │ │ X │ │
│
├───┼───┼───┼───┼───┼───┼───┼───┤
├───┼───┼───┼───┼───┼───┼───┼───┤
│
o │ │ o │ │ . │ │ . │ │
│ X │ │ X │ │ X │ │ X │ │
├───┼───┼───┼───┼───┼───┼───┼───┤
├───┼───┼───┼───┼───┼───┼───┼───┤
│
│ o │ │ ▒ │ │ . │ │ . │
│ │ X │ │ ▒ │ │ . │ │
X │
├───┼───┼───┼───┼───┼───┼───┼───┤
├───┼───┼───┼───┼───┼───┼───┼───┤
│
▒ │ │ ▒ │ │ . │ │ │
│ │ ▒ │ │ ▒ │ │ . │
│ │ │
├───┼───┼───┼───┼───┼───┼───┼───┤
├───┼───┼───┼───┼───┼───┼───┼───┤
│
│ B │ │ o │ │ │ │ │
│ │ B │ │ o │ │ │ │
│
└───┴───┴───┴───┴───┴───┴───┴───┘
└───┴───┴───┴───┴───┴───┴───┴───┘
Influence
Diagram, w bishop on b1 and corresponding Engagement Diagram.
The influence map shows that this piece has great mobility, if that is all you are counting. However,
this piece has been effectively constrained by black. The engagement diagram tells us this. Neil McDonald
in The Art of Planning in Chess says:
p.189"As so often, we need to remind ourselves that it isn't the fortune of the individual piece that matters
- it is how it functions with the other pieces. For this reason it is often completely meaningless to count the number of
squares, in the centre or otherwise, that a piece controls or attacks."
Conclusion
When we generate these maps, we obtain insight
through an effect that is like an x-ray - we can tell at a glance from the influence diagram and engagement diagram of the
proposed heuristic which pieces are "good" and "bad", and we can use these "constraints" to steer our search efforts, prune
our search tree, and evaluate our endpoint positions.
We can, in addition, use concepts from positional chess
theory in our evaluation function, and this can help us to predict, with a greater degree of accuracy, which positions are
more promising than others.
|
